Mac setup for software developers in 2019
August 14, 2019
Apple computers have always been amazing machines to code on. The near perfect build quality, sleek unix operating system and great user experience makes it a solid choice for us.
Although out of the box, it’s not quite perfect. The Touch Bar doesn’t quite live up to it’s potential. And the terminal - although fully functional, is also not quite as useful as it could be. Let’s see if we can fix that.
Heres my guide to getting the most out of your Macbook.
Preference Settings
Before we dive deep into some useful apps, there are a few preset settings I like to change in System Preferences. Most of these are personal preference, but test out the options and see what you like.
Fit more on your screen
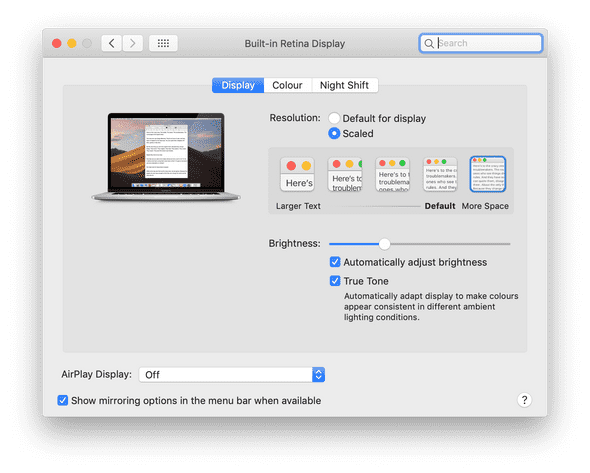
By default MacBooks use display scaling to enlarge anything on your screen. Sure this makes things easier to read, and could be better on the eyes since you won’t need to be squinting at small text. But you’d like to use all the pixels you paid for right? Same here.
You can find the resolution settings in Preferences > Displays > Display.
By selecting the Scaled option you can then choose how much scaling you’d prefer. I like to keep it set to the most space possible. But feel free to test the options and find your preference.
Keep your desktop clean
I share a similar philosophy when it comes to keeping my desktop clean, and keeping my room clean. I’m more likely to keep my cupboards organised, and my bed made if my room is kept somewhat tidy. Similarly I’m more likely to put effort into keeping my folders, desktop and to some extent - code - clean if I’m not overwhelmed by clutter every time I open my desktop.
Here’s a few ways I reduce desktop clutter.
My Dock generally has only around 5 or 6 of my most used apps on it. Finder, an IDE, my code editor of choice, a browser, my terminal, and Spotify.
By default you will also see recently closed apps remain in the Dock. If you find this useful don’t worry about the next steps, but if you’re like me and want to keep you Dock clean, you can prevent this from being the default behaviour.
In Preferences > Dock you can uncheck Show recent applications in Dock.
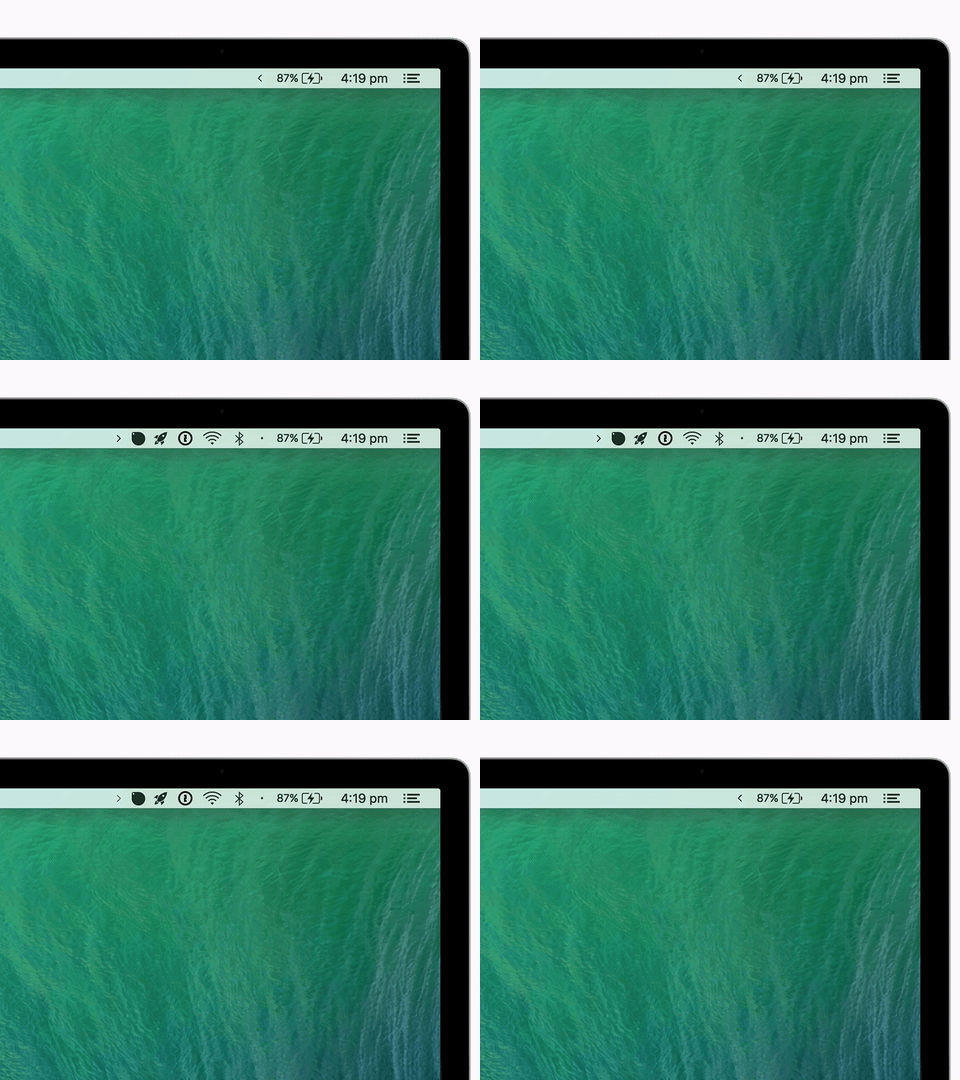
Now that we’ve cleared out the Dock, and got more space to work with on the screen, lets get to the top Menu Bar. After a few months of use you may start to notice your Menu Bar start to fill with some no-so-useful icons. Google Drive - I’m talking to you.
Most of these 3rd party icons can be removed from the Menu Bar from within the menu that is opened when clicking them. Another way to remove them is to drag them off the Menu Bar while holding down the Command (⌘) key.
If you want quite a few icons up there, but don’t want them displayed all the time you may find the Vanilla app useful. It allows you to hide some icons behind an expandable icon.

Supercharged terminal
Most Unix based systems, including MacOS use the bash shell. For those coming from the Windows shell this is a major upgrade. But the improvement don’t have to end there. The z-shell or ZSH is an alternative shell to bash, but with a few key improvements.
- Improved TAB autocompletion .
- Auto-correction for misspelled words or directories.
- Theming and improved colours make debugging in the terminal much easier on the eyes.
- And probably most useful - Improved command history. Just start typing the first few letters of a command then press up until you find that command in your history. Filtering out any commands that don’t start with those few letters.
Trust me, once you get started with ZSH you won’t want to go back to bash.
My terminal setup
- Hyper to replace the normal terminal
- Oh My Zsh to manage ZSH install
- The beautiful Pure theme
- ZSH Syntax Highlighting
I have a full article detailing my terminal setup with simple installation steps.
Get more out of the Touch Bar
Now I get why Apple made the change from fn keys to the Touch Bar. On paper the idea sounds great. As cool as changing browser tabs or scrubbing through video from the Touch Bar is, I just can’t help feeling that there’s always a faster way to do these things using normal keyboard shortcuts.
I found my biggest issue was not that the Touch Bar was inherently not useful, it was rather that I just always forgot to use it. Primarily because almost every app uses it in different ways. Essentially its biggest strength is also its biggest weakness, it’s versatility.
My solution was to forgo the dynamicness of the Touch Bar, by replacing it with a fixed set of buttons and widget that stay the same no matter what app I am using.
BetterTouchTool is the tool I use to achieve this. It allows you to completely customise the Touch Bar to your liking. The app is very powerful and very versatile. Check out my full guide here to set up your Touch Bar like mine.
Now I know my setup is simple. But it’s got pretty much all the functionality I used on my previous Macbook 2015. My volume and brightness buttons are always only one click away. With one tap I can open Spotify and play what I was last listening to - even after a full restart. And probably most useful, my escape key is expanded and has ample space around so I don’t have to have the focus of a Shaolin monk just to make sure I don’t miss-click.
So there we go. This is pretty much my ideal way to get a new macOS machine ready for the many hours of programming ahead. Hope you enjoyed the read.


